Teensy 2.0 with Garageband
Download Teensy 2.0 loader for your operating system.
Download the Arduino add-on Teensyduino for you operating system. Follow the steps on that page, if when you get to step where you navigate to the Arduino software and do not see Arduino in your applications folder (or wherever it usually lives). Go to Arduino.cc to get a fresh download. It should recognize it after installing again.
Once you have the add-on installed, you can upload any Arduino sketch to your teensy from the Arduino IDE. Check out the documentation on that here.
The really cool thing about the teensy 2.0 is that you can send MIDI (musical instrument digital interface) messages very easily. This is usually not an entirely easy thing to do, but with the teensy, you can upload a sketch and get jamming right away.
Open Arduino and a new sketch. Copy and paste the below code.
|
1 2 3 4 5 6 7 8 9 10 11 12 13 14 15 16 17 18 19 20 21 22 23 24 25 26 27 28 29 30 31 32 33 34 35 36 37 38 39 40 41 42 43 |
/* Button to USB MIDI Example You must select MIDI from the "Tools > USB Type" menu To view the raw MIDI data on Linux: aseqdump -p "Teensy MIDI" This example code is in the public domain. */ #include <Bounce.h> // the MIDI channel number to send messages const int channel = 1; const int buttonPin = 2; // Create Bounce objects for each button. The Bounce object // automatically deals with contact chatter or "bounce", and // it makes detecting changes very simple. Bounce button2 = Bounce(buttonPin, 5); // which is appropriate for good void setup() { pinMode(buttonPin, INPUT_PULLUP); } void loop() { // Update all the buttons. There should not be any long // delays in loop(), so this runs repetitively at a rate button2.update(); // Check each button for "falling" edge. // Send a MIDI Note On message when each button presses // Update the Joystick buttons only upon changes. // falling = high (not pressed - voltage from pullup resistor) // to low (pressed - button connects pin to ground) if (button2.fallingEdge()) { usbMIDI.sendNoteOn(63, 99, channel); // 63 = D#4 Serial.println("note played"); } } |
Read the comments carefully. There are coupld different ways things are happening with this code, than with the typical DigitalReadSerial or Button example Arduino provides. A library in this sketch is being used called Bounce is being used. If digitalRead() is used to read the button presses the trigger is very sensitive. Bounce helps it slow down and uses the function fallingEdge() to detect when the button goes from high to low (5 volt to 0 volts). Here you can see there is more than one way to read a button state!
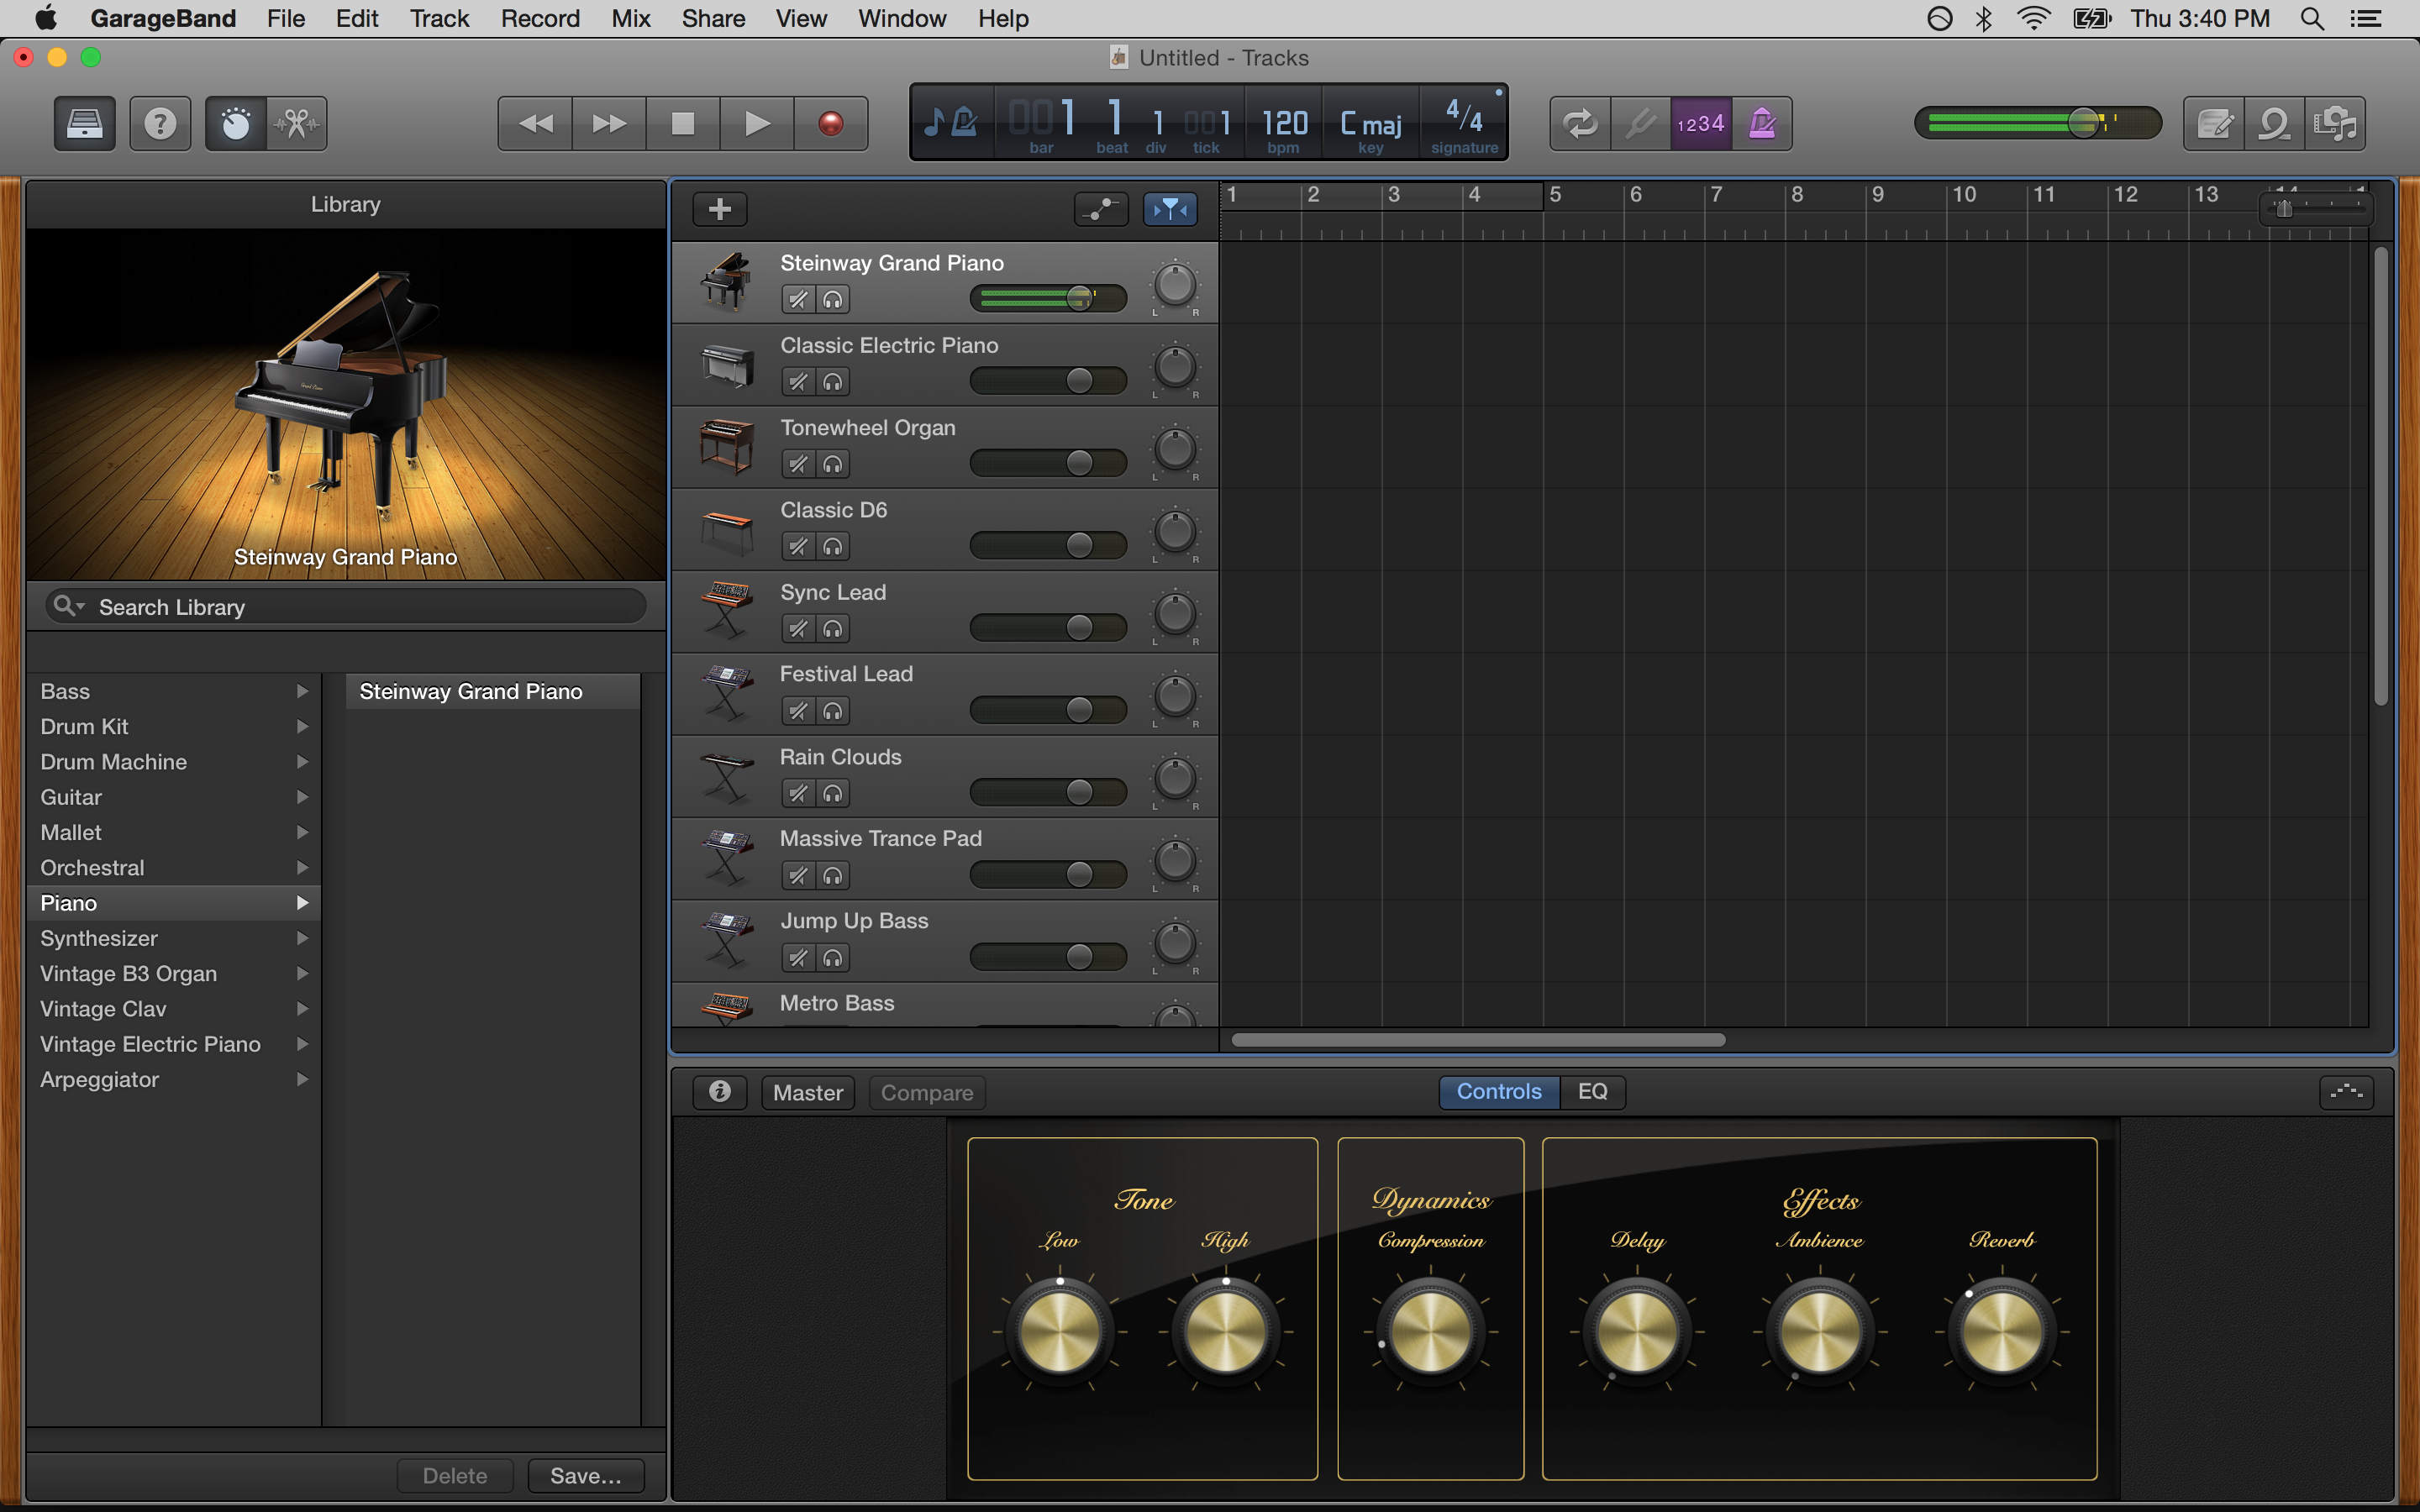
Open GarageBand, if you can’t find it in your applications folder, go to the App store and search for it. It may tell you it’s $4.99, click on install and it will end up telling you that the update is actually free, since your mac should of come with it preloaded.
Choose a new keyboard project.

The teensy will automatically be seen as a MIDI device that you have connected to your computer. Press the button and it will play a keyboard note!
You can change the note in the Arduino sketch
|
1 |
D#4 |
And you can choose other sounds in GarageBand from the library, such as “Dreamy Bells” on a synthesizer.

LilyPad USB/Flora with Soundplant 43
The LilyPad USB and Flora can not only trigger lights, motors and other actuators, it can also act as a HID (human interface device). HIDs are mouses and keyboards. This means that you can read a button and when it’s pressed it will act like a keypress on your keyboard. You can assign this keystroke to a letter or a key like SHIFT or CTRL, to make all kinds of stuff happen.
In this tutorial, you will be printing a character that will trigger a sound that it is assigned to it in the application Soundplant.
Connect two switches to pins 2 and 3. Plug in the Arduino and open a new sketch. Copy and paste the below code.
|
1 2 3 4 5 6 7 8 9 10 11 12 13 14 15 16 17 18 19 20 21 22 23 24 25 26 27 28 29 |
#include "Keyboard.h" void setup() { // make pin 2 and 3 an input and turn on the // pullup resistor so it goes high unless // connected to ground: pinMode(2, INPUT_PULLUP); pinMode(3, INPUT_PULLUP); // initialize control over the keyboard: Keyboard.begin(); } void loop() { if (digitalRead(2) == LOW) { //once you initialize Keyboard.press(), Arduino //will take over your keyboard. Wrap it up in a //button press so it doesn't initialize until the //user says so. Keyboard.press('n'); delay(100); Keyboard.releaseAll(); } if (digitalRead(3) == LOW) { Keyboard.press('b'); delay(100); Keyboard.releaseAll(); } } |
Upload and open up TextEdit or something else that you can type into. Press the button on pin 2 and watch it type the character ‘n’. You will need to adjust the sensitivity of the press. This is done by tweaking the amount of the delay() between it pressing the key down using Keyboard.press() and the release of the key using Keyboard.releaseAll(). Try typing in lower numbers like 10 and higher numbers like 1000 (1 second).
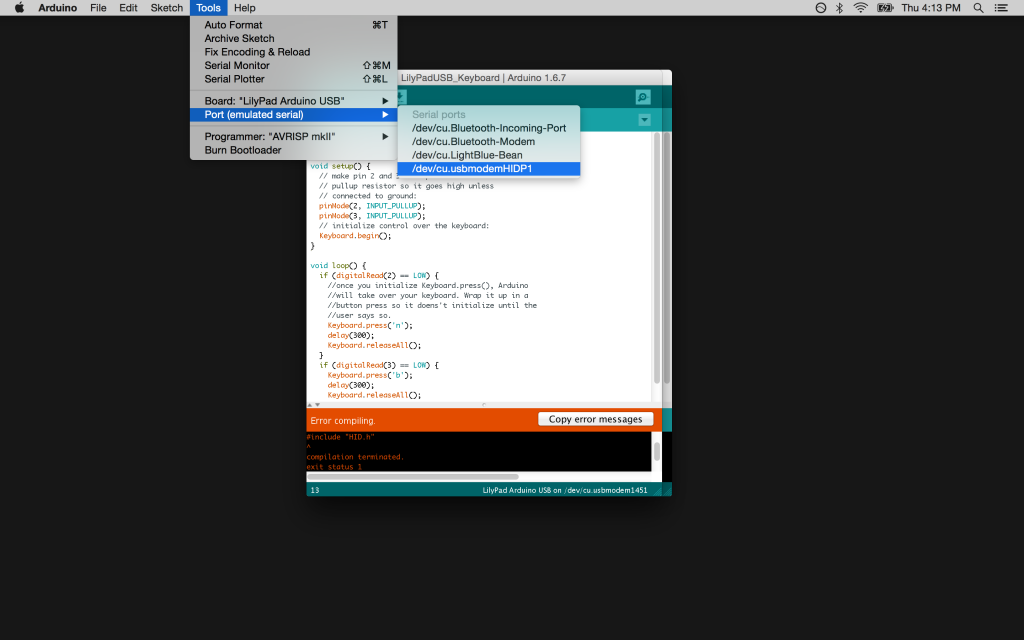
If you need to upload a sketch now, the LilyPad is seen as an USB HID device, you will need to choose this new port option under ports before each upload.
Download Soundplant for your OS.
Open Soundplant and you will see a keyboard.
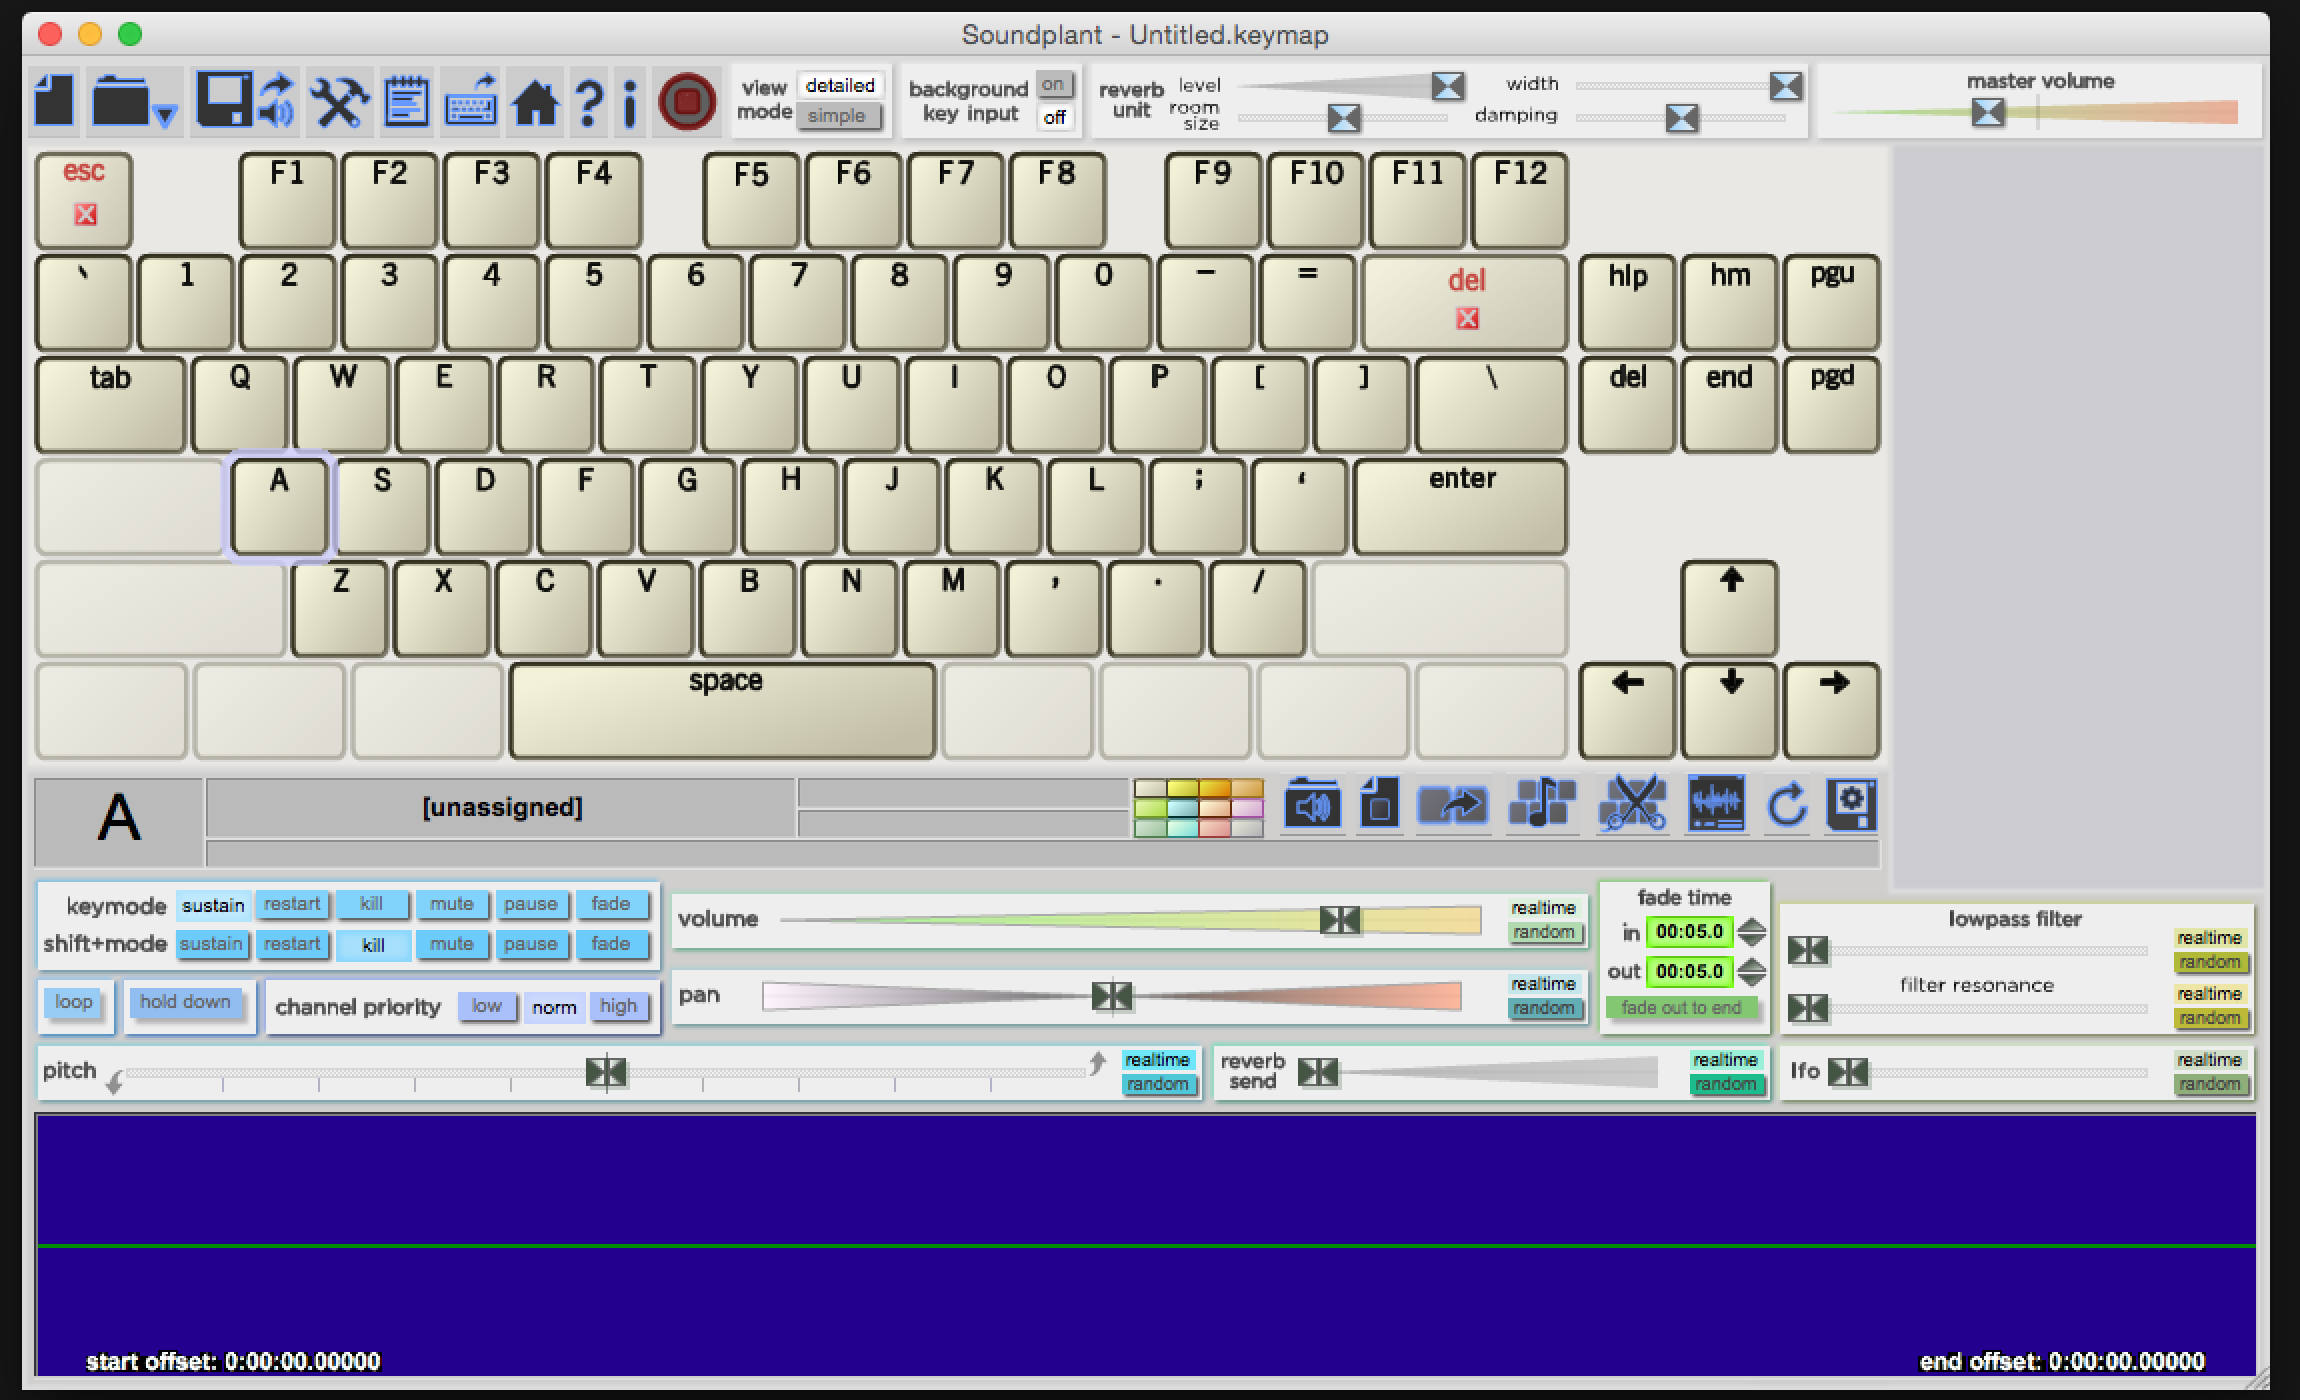
Soundplant makes is really easy to assign sounds to the keyboard. Navigate to an audio file using finder, choose a file and drag it on top of the key you want to assign it to. In this case, you want to assign it to the ‘n’ and ‘b’ key because that is what we told our Arduino sketch to assign to our button presses.

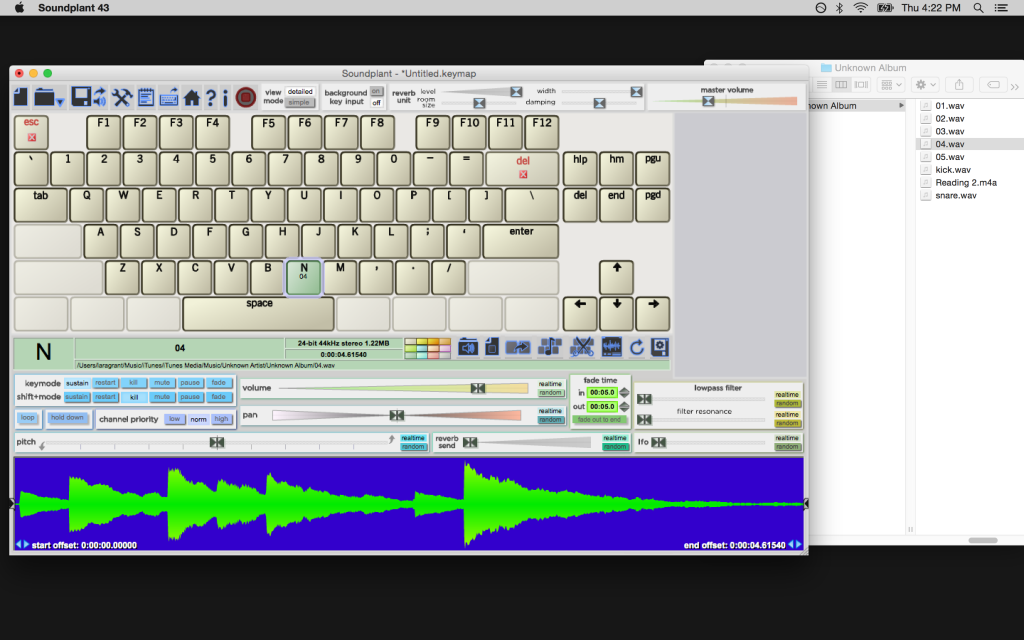 N Key is now assigned!
Press a button to listen to the sample! it will also scrub through and you can watch it play out it’s entirety. Play around, you can trigger multiple events at once which can be fun.

Both keys assigned and N sound is playing.
Adafruit Feather Bluefruit with Soundplant
Adafruit’s new Feather Bluefruit brings a microcontroller and bluetooth together into one small powerful package. It is easy to get up and running, sending keystrokes to Soundplant, but wirelessly!
Connect the Feather using a USB cable and hook up a switch to pin 2.
Open up Arduino and a new sketch.
Copy and paste the code below.
|
1 2 3 4 5 6 7 8 9 10 11 12 13 14 15 16 17 18 19 20 21 22 23 24 25 26 27 28 29 30 31 32 33 34 35 36 37 38 39 40 41 42 43 44 45 46 47 48 49 50 51 52 53 54 55 56 57 58 59 60 61 62 63 64 65 66 67 68 69 70 71 72 73 74 75 76 77 78 79 80 81 82 83 84 85 86 87 88 89 90 91 92 93 94 95 96 97 98 99 100 101 102 103 104 105 106 107 108 109 110 111 112 113 114 115 116 117 118 119 120 121 122 123 124 125 126 127 128 129 130 131 132 133 134 135 136 137 138 139 140 141 142 143 144 145 146 147 148 149 150 151 152 153 154 155 156 157 158 159 160 161 162 163 164 165 166 167 168 169 170 171 172 173 174 175 176 177 178 179 180 181 182 183 184 185 186 187 188 189 190 191 192 193 194 195 196 197 198 199 200 201 202 203 204 205 206 207 208 209 210 211 212 213 214 215 216 217 218 219 220 221 222 223 224 |
/********************************************************************* This is an example for our nRF51822 based Bluefruit LE modules Pick one up today in the adafruit shop! Adafruit invests time and resources providing this open source code, please support Adafruit and open-source hardware by purchasing products from Adafruit! MIT license, check LICENSE for more information All text above, and the splash screen below must be included in any redistribution *********************************************************************/ /* This example shows how to send HID (keyboard/mouse/etc) data via BLE Note that not all devices support BLE keyboard! BLE Keyboard != Bluetooth Keyboard */ #include <Arduino.h> #include <SPI.h> #if not defined (_VARIANT_ARDUINO_DUE_X_) #include <SoftwareSerial.h> #endif #include "Adafruit_BLE.h" #include "Adafruit_BluefruitLE_SPI.h" #include "Adafruit_BluefruitLE_UART.h" #include "BluefruitConfig.h" /*========================================================================= APPLICATION SETTINGS FACTORYRESET_ENABLE Perform a factory reset when running this sketch Enabling this will put your Bluefruit LE module in a 'known good' state and clear any config data set in previous sketches or projects, so running this at least once is a good idea. When deploying your project, however, you will want to disable factory reset by setting this value to 0. If you are making changes to your Bluefruit LE device via AT commands, and those changes aren't persisting across resets, this is the reason why. Factory reset will erase the non-volatile memory where config data is stored, setting it back to factory default values. Some sketches that require you to bond to a central device (HID mouse, keyboard, etc.) won't work at all with this feature enabled since the factory reset will clear all of the bonding data stored on the chip, meaning the central device won't be able to reconnect. MINIMUM_FIRMWARE_VERSION Minimum firmware version to have some new features -----------------------------------------------------------------------*/ #define FACTORYRESET_ENABLE 0 #define MINIMUM_FIRMWARE_VERSION "0.6.6" /*=========================================================================*/ const int buttonPin = 2; // Create the bluefruit object, either software serial...uncomment these lines /* SoftwareSerial bluefruitSS = SoftwareSerial(BLUEFRUIT_SWUART_TXD_PIN, BLUEFRUIT_SWUART_RXD_PIN); Adafruit_BluefruitLE_UART ble(bluefruitSS, BLUEFRUIT_UART_MODE_PIN, BLUEFRUIT_UART_CTS_PIN, BLUEFRUIT_UART_RTS_PIN); */ /* ...or hardware serial, which does not need the RTS/CTS pins. Uncomment this line */ // Adafruit_BluefruitLE_UART ble(BLUEFRUIT_HWSERIAL_NAME, BLUEFRUIT_UART_MODE_PIN); /* ...hardware SPI, using SCK/MOSI/MISO hardware SPI pins and then user selected CS/IRQ/RST */ Adafruit_BluefruitLE_SPI ble(BLUEFRUIT_SPI_CS, BLUEFRUIT_SPI_IRQ, BLUEFRUIT_SPI_RST); /* ...software SPI, using SCK/MOSI/MISO user-defined SPI pins and then user selected CS/IRQ/RST */ //Adafruit_BluefruitLE_SPI ble(BLUEFRUIT_SPI_SCK, BLUEFRUIT_SPI_MISO, // BLUEFRUIT_SPI_MOSI, BLUEFRUIT_SPI_CS, // BLUEFRUIT_SPI_IRQ, BLUEFRUIT_SPI_RST); // A small helper void error(const __FlashStringHelper*err) { Serial.println(err); while (1); } /**************************************************************************/ /*! @brief Sets up the HW an the BLE module (this function is called automatically on startup) */ /**************************************************************************/ void setup(void) { pinMode(buttonPin, INPUT_PULLUP); while (!Serial); // required for Flora & Micro delay(500); Serial.begin(115200); Serial.println(F("Adafruit Bluefruit HID Keyboard Example")); Serial.println(F("---------------------------------------")); /* Initialise the module */ Serial.print(F("Initialising the Bluefruit LE module: ")); if ( !ble.begin(VERBOSE_MODE) ) { error(F("Couldn't find Bluefruit, make sure it's in CoMmanD mode & check wiring?")); } Serial.println( F("OK!") ); if ( FACTORYRESET_ENABLE ) { /* Perform a factory reset to make sure everything is in a known state */ Serial.println(F("Performing a factory reset: ")); if ( ! ble.factoryReset() ) { error(F("Couldn't factory reset")); } } /* Disable command echo from Bluefruit */ ble.echo(false); Serial.println("Requesting Bluefruit info:"); /* Print Bluefruit information */ ble.info(); /* Change the device name to make it easier to find */ Serial.println(F("Setting device name to 'Bluefruit Keyboard': ")); if (! ble.sendCommandCheckOK(F( "AT+GAPDEVNAME=Bluefruit Keyboard" )) ) { error(F("Could not set device name?")); } /* Enable HID Service */ Serial.println(F("Enable HID Service (including Keyboard): ")); if ( ble.isVersionAtLeast(MINIMUM_FIRMWARE_VERSION) ) { if ( !ble.sendCommandCheckOK(F( "AT+BleHIDEn=On" ))) { error(F("Could not enable Keyboard")); } } else { if (! ble.sendCommandCheckOK(F( "AT+BleKeyboardEn=On" ))) { error(F("Could not enable Keyboard")); } } /* Add or remove service requires a reset */ Serial.println(F("Performing a SW reset (service changes require a reset): ")); if (! ble.reset() ) { error(F("Couldn't reset??")); } Serial.println(); Serial.println(F("Go to your phone's Bluetooth settings to pair your device")); Serial.println(F("then open an application that accepts keyboard input")); Serial.println(); Serial.println(F("Enter the character(s) to send:")); Serial.println(F("- \\r for Enter")); Serial.println(F("- \\n for newline")); Serial.println(F("- \\t for tab")); Serial.println(F("- \\b for backspace")); Serial.println(); } /**************************************************************************/ /*! @brief Constantly poll for new command or response data */ /**************************************************************************/ void loop() { int buttonState = digitalRead(buttonPin); // Check for user input and echo it back if anything was found char keys[BUFSIZE + 1]; //getUserInput(keys, BUFSIZE); if (buttonState == LOW) { Serial.print("\nSending "); Serial.println(keys); ble.print("AT+BleKeyboard="); delay(500); ble.println('n'); delay(500); if ( ble.waitForOK() ) { Serial.println( F("OK!") ); } else { Serial.println( F("FAILED!") ); } } } /**************************************************************************/ /*! @brief Checks for user input (via the Serial Monitor) */ /**************************************************************************/ void getUserInput(char buffer[], uint8_t maxSize) { memset(buffer, 0, maxSize); while ( Serial.peek() < 0 ) {} delay(2); uint8_t count = 0; do { count += Serial.readBytes(buffer + count, maxSize); delay(2); } while ( (count < maxSize) && !(Serial.peek() < 0) ); } |
This code is a bit clunky and can be cleaned up, stay tuned for an update!
Before this code works, a file needs to added to the sketch. To do this, click on the downward arrow button below the serial monitor button and select “New Tab”. Name it BluefruitConfig.h
Copy and paste the code from the above link. Verify to make sure every was copied ok.
Upload sketch and open the serial monitor. The information of the bluefruit module and checks will print out telling you if everything is OK. It will end by telling you to pair with your phone and some commands to send it from typing in the text field above.
You can pair it with your phone through your settings, but let’s pair it with the computer instead so we can use Soundplant. Press the button, even if you aren’t paired with something and a command with the letter ‘n’ should still print along with an OK after it’s successfully be sent. If not, pair it with the computer first.
Before pairing with the computer, plug in a LiPo battery and unplug the USB cable to disconnect from the computer.
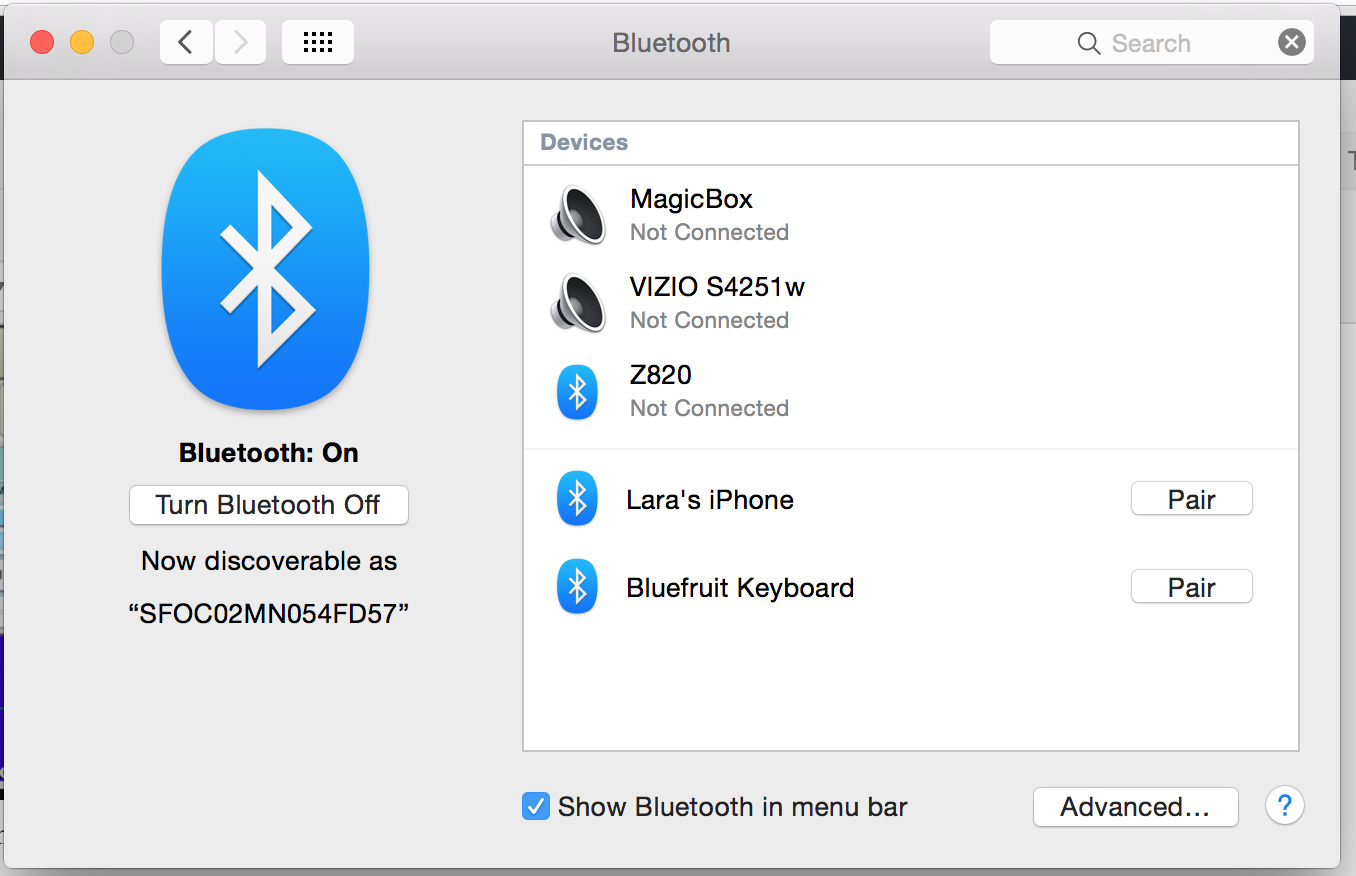
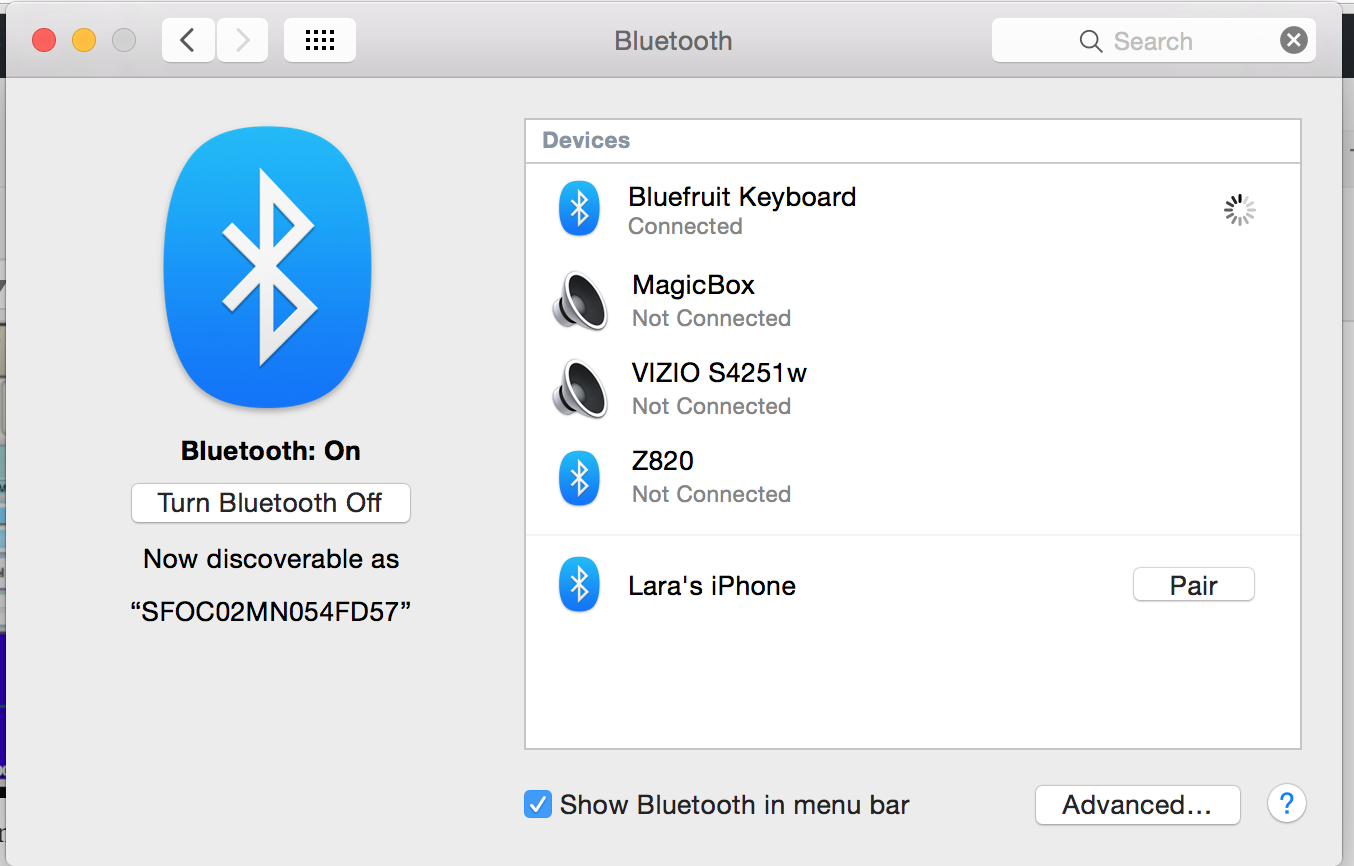
To pair on a Mac, go to System Prefences and click on Bluetooth. A window will pop up and scan for devices, choose Bluefruit Keyboard and pair. For Windows go to the Control Panel and find the bluetooth settings.
To test, open up a text document and push the button, ‘n’ should print each time you press. If it’s working open up Soundplant and assign a sound to the N key, you can see how to do that by scrolling up and checking out the LilyPad/Flora with Soundplant section. Once a sound is assigned, press the button and the soundbite will play.